


Git is a distributed version-control system for tracking changes in source code during software development. It is designed for coordinating work among programmers, but it can be used to track changes in any set of files. Its goals include speed, data integrity, and support for distributed, non-linear workflows - wikipedia
In short words git helps you to coordinate with others while doing projects and track changes did. Let's setup git on our system and see how it works
Create a local git repository
For example our project is in myprojects folder, then we have to navigate to that path create our directory and initialise a git repository there.
$cd myprojects
$mkdir projectx
$cd projectx
$git init
git init command helps you to initialise git repository
Add a new file to track changes
Now lets add a .txt file to track changes in this text file
$touch file.txt
now open this txt file and change its contents and type git status on cmd to check status of our repository
$git status

On branch master

Initial commit

Untracked files:
  (use "git add <file>..." to include in what will be committed)

    file.txt

nothing added to commit but untracked files present (use "git add" to track)
git prompts us that we have untracked files because we need to add changes to staging area
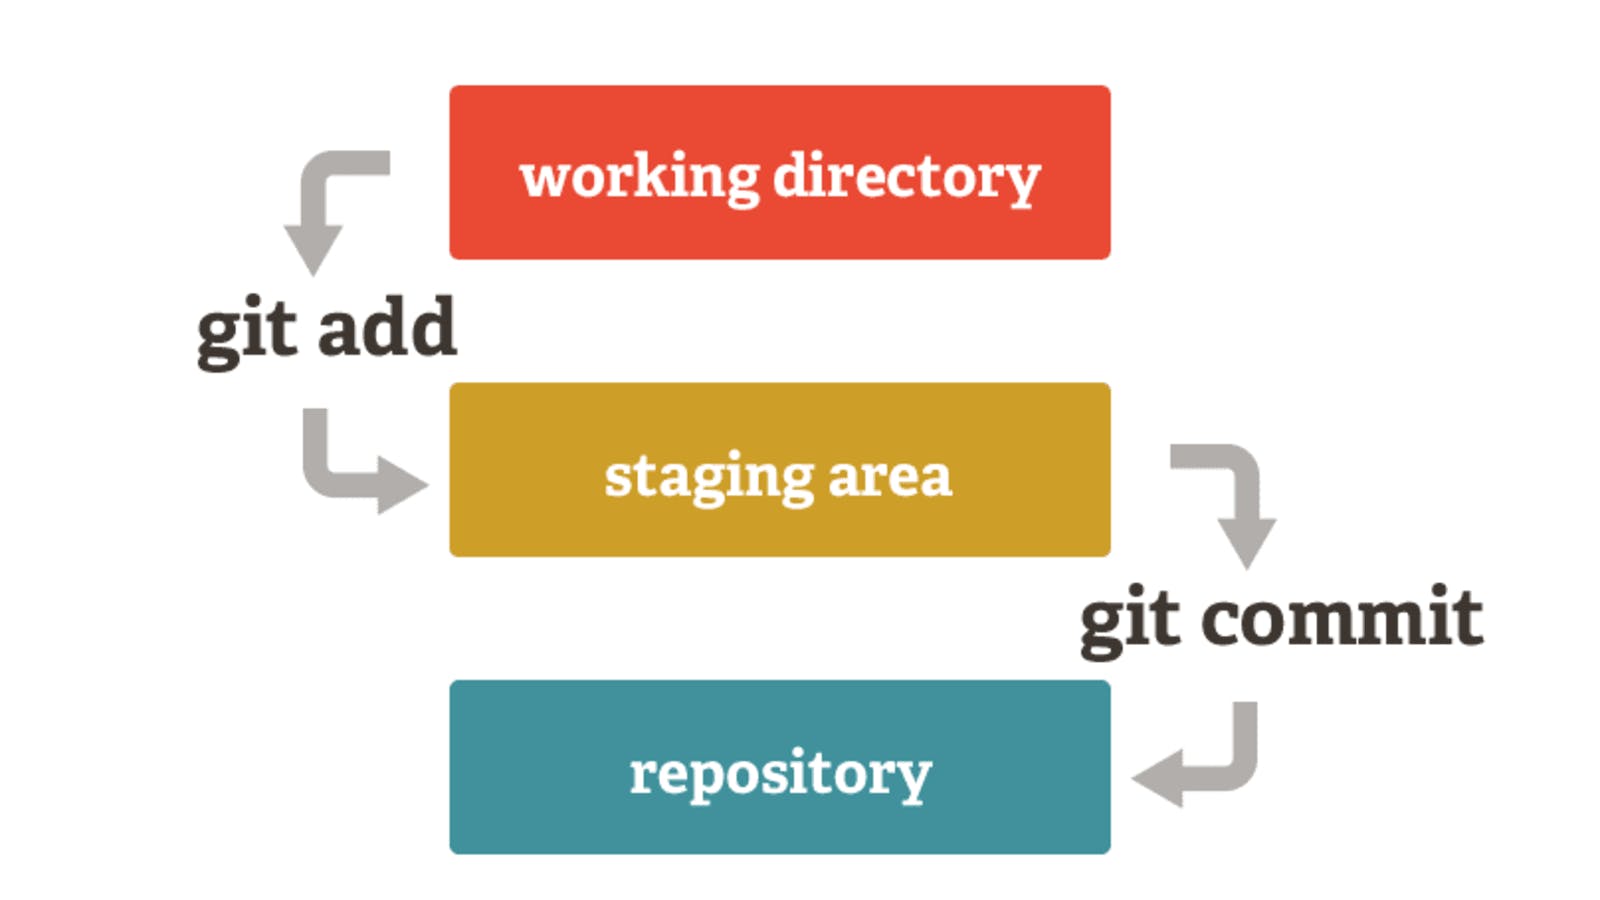
staging area is like a shopping cart , in order to commit(save) our changes we need to add our changes to staging area we can do this by using git add * command ,it adds all the files in our repository to staging area once we add our changes to staging area we can commit our work using git commit command.
$ git add *
$git commit -m "added file.txt"
[master (root-commit) c05dbda] added file.txt
 1 file changed, 0 insertions(+), 0 deletions(-)
 create mode 100644 file.txt
here string after -m indicates the commit message , we need to enter a meaningful description of changes we made
now if we enter git status we can see that there are no untracked files and our working tree is clean
Head indicates where our git is currently pointing
Creating a new branch
Now that you've made a new commit, let's try something a little more advanced.
Say you want to make a new feature but are worried about making changes to the main project while developing the feature. This is where git branches come in.
Branches allow you to move back and forth between 'states' of a project. For instance, if you want to add a new page to your website you can create a new branch just for that page without affecting the main part of the project. Once you're done with the page, you can merge your changes from your branch into the master branch. When you create a new branch, Git keeps track of which commit your branch 'branched' off of, so it knows the history behind all the files.
Let's say you are on the master branch and want to create a new branch to develop your web page. Here's what you'll do: Run git checkout -b <my branch name>. This command will automatically create a new branch and then 'check you out' on it, meaning git will move you to that branch, off of the master branch.
After running the above command, you can use the git branch command to confirm that your branch was created:
$ git branch
  master
* my-new-branch
The branch name with the asterisk next to it indicates which branch you're pointed to at that given time.
Now, if you switch back to the master branch and make some more commits, your new branch won't see any of those changes until you merge those changes onto your new branch.
Creating a new repository on github
If you only want to keep track of your code locally, you don't need to use GitHub. But if you want to work with a team, you can use GitHub to collaboratively modify the project's code.
To create a new repo on GitHub, log in and go to the GitHub home page. You should see a green '+ New repository' button:
 It will prompt you to fill information
When you're done filling out the information, press the 'Create repository' button to make your new repo.
It will prompt you to fill information
When you're done filling out the information, press the 'Create repository' button to make your new repo.
GitHub will ask if you want to create a new repo from scratch or if you want to add a repo you have created locally. In this case, since we've already created a new repo locally, we want to push that onto GitHub so follow the '....or push an existing repository from the command line' section:
$git remote add origin https://github.com/satwikchinna/mynewrepository.git
$git push -u origin master
Counting objects: 3, done.
Writing objects: 100% (3/3), 263 bytes | 0 bytes/s, done.
Total 3 (delta 0), reused 0 (delta 0)
To https://github.com/satwikchinna/mynewrepository.git
 * [new branch]      master -> master
Branch master set up to track remote branch master from origin.
Push a branch to github
Now we'll push the commit in your branch to your new GitHub repo. This allows other people to see the changes you've made. If they're approved by the repository's owner, the changes can then be merged into the master branch.
To push changes onto a new branch on GitHub, you'll want to run git push origin yourbranchname. GitHub will automatically create the branch for you on the remote repository:
$git push origin my-new-branch
Counting objects: 3, done.
Delta compression using up to 8 threads.
Compressing objects: 100% (2/2), done.
Writing objects: 100% (3/3), 313 bytes | 0 bytes/s, done.
Total 3 (delta 0), reused 0 (delta 0)
To https://github.com/cubeton/mynewrepository.git
 * [new branch]      my-new-branch -> my-new-branch
now all your changes will be pushed to your online repository
Git eases the life of a developer there are still lot of features like merging,raising pull request etc.. but i will leave it to you Thanks for reading :)